
Read Time:4 Minute, 50 Second
前回、別記事「Firebase HostingへのFlutter Web登録手順」を実施したのですが、今回は(前回後回しにしてしまった)Firebase Emulator Suiteを利用して、Flutterアプリをローカル開発しよう、という手順を実施しました。
以下その際の備忘録です。
1.Flutterプロジェクトの確認
(1)Flutterプロジェクト
以降でFirebase Emulatorインストール後、初期化の前提として、Flutterプロジェクトが必要です。
※Firebase Emulator 初期化は、対象となるFlutterプロジェクトフォルダ直下で実行する必要があるからです。
(2)Flutter成果物
またFirebase Emulator実行の前提としては、Flutter成果物(例:build直下のWebアプリ等)が作成されていることが必要です。
※Firebase Emulator実行時に(初期化で指定したフォルダ(例:public)に上記Flutter成果物をコピーしておかないと、成果物が見つからない、という理由で、Emulatorが停止してしまうからです。
→別記事「[基礎知識]Firebase HostingへのFlutter Web登録手順」参照
2.Firebase Emulator Suite のセットアップ
(1)Firebase CLI のインストール
- Firebase CLI は、Firebase プロジェクトを管理するためのコマンドライン ツールです。
- インストール方法:
>npm install -g firebase-tools

※インストール有無確認:
> firebase –version

(2)Firebase プロジェクトの初期化
(2-1)最初の初期化
最初に初期化した際の応答記録です。
※実際には以下の(2-2)で2回目以降の応答も実施済みで、(2-1)と異なる内容なので記録してあります。
ローカル環境のFlutterプロジェクトを以下の手順で接続します。
> cd <flutterプロジェクトフォルダ(※pubspec.yamlが置いてあるフォルダ)>
> firebase init

- 必要な Firebase の機能(例:Firestore、Functions、Authentication など)を選択します。
以下、対話形式で質問されますので、ここでは以下の選択・入力を行います。
| 質問 | 選択・入力 |
|---|---|
| Are you ready to proceed? | Y |
| Which Firebase features do you want to set up for this directory? | Emulators: Set up local emulators for Firebase products |
| Please select an option: (Use arrow keys) | Use an existing project ※前手順1で作成したプロジェクトを使う為 |
| Select a default Firebase project for this directory: (Use arrow keys) | (前手順1で作成したプロジェクトを選択) もしくは (前手順1で作成したプロジェクト名入力) |
| Which Firebase emulators do you want to set up? | (Strage以外を選択しました。) |
| Which port do you want to use for the auth emulator? (9099) | (デフォルト(9099)を選択しました。) |
| Which port do you want to use for the functions emulator? (5001) | (9088を指定しました。) |
| Which port do you want to use for the firestore emulator? (8080) | (デフォルト(8080)を選択しました。) |
| Which port do you want to use for the database emulator? (9000) | (デフォルト(9000)を選択しました。) |
| Which port do you want to use for the hosting emulator? (5000) | (デフォルト(5000)を選択しました。) |
| Which port do you want to use for the pubsub emulator? (8085) | (デフォルト(8085)を選択しました。) |
| Which port do you want to use for the eventarc emulator? (9299) | (デフォルト(9299)を選択しました。) |
| Would you like to enable the Emulator UI? (Y/n) | Y |
| Which port do you want to use for the Emulator UI (leave empty to use any available port)? | (8090を指定しました。) |
| Would you like to download the emulators now? (Y/n) | Y |
補足)上記2番目の質問時の選択肢:
Realtime Database: Configure a security rules file for Realtime Database and (optionally) provision default instance
Firestore: Configure security rules and indexes files for Firestore
Functions: Configure a Cloud Functions directory and its files
Hosting: Configure files for Firebase Hosting and (optionally) set up GitHub Action deploys
Hosting: Set up GitHub Action deploys
Storage: Configure a security rules file for Cloud Storage
Emulators: Set up local emulators for Firebase products
Frameworks: Get started with Frameworks projects.
補足)上記3番目の質問について、アカウントやプロジェクトを未作成の場合:
別記事「[基礎知識]Firebaseの新規プロジェクト作成手順」参照
補足)上記5番目の質問時の選択肢:
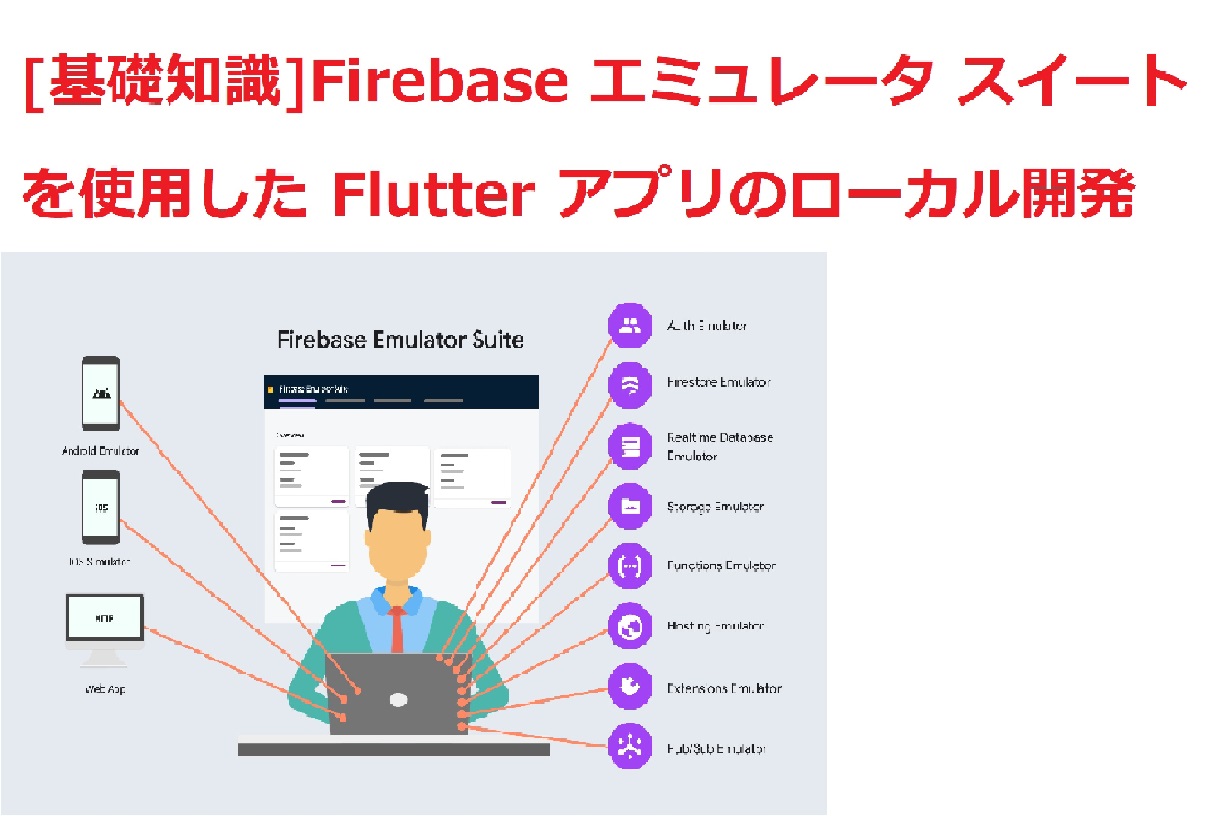
利用するFirebaseサービスに応じて(例えば、GoogleのFlutterに関するFirebase Emulator Suiteのサンプルコードを実行するため等)、適切なエミュレーターを選択する必要があります。
一般的に、以下のように選択します。
①Authentication Emulator:
Firebase Authenticationを使用している場合(ユーザー認証機能)
②Functions Emulator:
Firebase Cloud Functionsを使用している場合(サーバーレス関数)
③Firestore Emulator:
Firebase Firestoreを使用している場合(NoSQLデータベース)
④Database Emulator:
Firebase Realtime Databaseを使用している場合
⑤Hosting Emulator:
Firebase Hostingを使用している場合(ウェブアプリケーションのホスティング)
⑥Pub/Sub Emulator:
FirebaseでGoogle Cloud Pub/Subを使用している場合
⑦Storage Emulator:
Firebase Storageを使用している場合(ファイルストレージ)
⑧Eventarc Emulator:
Google Cloud Platformのメッセージングサービスです。
Eventarcを使用すると、Cloud Functions、Cloud Run、Google Kubernetes Engineなどのサービスに対して、外部イベントをトリガーすることができます。
FlutterのFirebaseサンプルコードの内容に基づいて、使用されているFirebaseサービスを確認し、それに対応するエミュレーターを選択します。たとえば、サンプルアプリがユーザー認証、Firestoreデータベース、Cloud Functionsを使用している場合は、それぞれ「Authentication Emulator」、「Firestore Emulator」、「Functions Emulator」を選択します。
また、Firebase CLIで複数のエミュレーターを同時に選択することも可能です。これにより、複数のFirebaseサービスを統合して使用するアプリケーションの開発とテストが容易になります。サンプルコードの要件に応じて適切なエミュレーターを選択してください。
選択操作について)
- スペースキー (
<space>):- これを押すと、カーソルが現在指しているエミュレータ(例:Authentication Emulator, Functions Emulator 等)を選択または選択解除します。
<a>キー:- これを押すと、リストにあるすべてのエミュレータを選択、またはすべての選択を解除します。
<i>キー:- 現在の選択を反転します。つまり、選択されていないエミュレータは選択され、選択されているエミュレータは選択解除されます。
補足)上記6番目の質問について:
firebase init コマンド中で「Which port do you want to use for the auth emulator? (9099)」と尋ねられた場合、これは Firebase Authentication Emulator を実行するためのポート番号を設定するための質問です。どのように答えるべきかは、主にあなたの開発環境と要件に依存します。
- デフォルトポートを使用する:
- もし他のアプリケーションがポート9099を使用していない場合、単純に Enter キーを押してデフォルトのポート9099を使用することができます。
- デフォルトポートはFirebaseチームによって推奨されているため、特に理由がない限りはこのポートを使用することが一般的です。
- カスタムポートを使用する:
- 既にポート9099が他のサービスやアプリケーションで使用されている場合、または特定のポートを使用したい場合は、使用したいポート番号を入力します。
- 例:8080 と入力して Enter キーを押すと、ポート8080でAuthentication Emulatorが実行されます。
- 注意点:
- 選択したポートが他のプロセスによって使用されていないことを確認してください。
- Firebase Emulator Suite を使用する際は、他のエミュレータ(例:Firestore Emulator, Functions Emulator)とポート番号が衝突しないように管理することが重要です。
Firebase Emulator Suite の設定は、.firebase.json ファイルに保存され、後で必要に応じて変更することが可能です。ポート番号の選択は、主にあなたのローカル開発環境に適したものを選ぶことが重要です。

(2-2)2回目以降の初期化
| 質問 | 選択・入力 |
| Are you ready to proceed? | Y |
| Which Firebase features do you want to set up for this directory? | Hosting: Configure files for Firebase Hosting and (optionally) set up GitHub Action deploys |
| What do you want to use as your public directory? | public |
| Configure as a single-page app (rewrite all urls to /index.html)? | N |
| Set up automatic builds and deploys with GitHub? | N |
| File public/404.html already exists. Overwrite? | Y |
| File public/index.html already exists. Overwrite? | Y |

(3)Emulator Suite の設定
上記(2-2)後の応答記録になります。
①Flutter成果物がFirebase初期化時設定実行フォルダ(例:public)にコピーしてあること
→別記事「[基礎知識]Firebase HostingへのFlutter Web登録手順」参照

②Flutterプロジェクトフォルダに移動します。
例> cd Y:\app\Flutter\PJ01
③Emulator Suite 初期化
※以下のコマンドを実行すると、上記(2)で設定した内容を確認・変更できます。
> firebase init emulators
| Are you ready to proceed? | Yes |
| Please select an option: | Use an existing project |
| Select a default Firebase project for this directory: | (前回作成プロジェクト) |
| Which Firebase emulators do you want to set up? | Hosting Emulator |
| Which port do you want to use for the hosting emulator? | 5000 ※空きポート |
| Would you like to enable the Emulator UI? | Yes |
| Which port do you want to use for the Emulator UI (leave empty to use any available port)? | (そのままEnter) ※default 4000 |
| Would you like to download the emulators now? | Yes |
補足)Emulator UI について:
Firebase Emulator Suiteには、Emulator UI(ユーザーインターフェース)という機能があります。これは、Firebaseの各種エミュレータ(例えばFirestore、Functions、Authenticationなど)をウェブベースのインターフェースを通じて視覚的に管理し、デバッグするためのツールです。
Emulator UIを有効にすると、ブラウザを使ってローカルで実行されているエミュレータを監視し、Firestoreのドキュメントを確認したり、Authenticationのユーザーを管理したり、Functionsのログを見たりすることができます。実際にデプロイする前にローカルで動作を確認する際に非常に便利です。
Would you like to enable the Emulator UI? (Y/n) という質問は、このEmulator UIを有効にするかどうかを尋ねています。Yを選択すると、Emulator Suiteの起動時にウェブベースのUIが開始され、エミュレータをより簡単に操作できるようになります。もしUIを利用しない場合はnを選択します。
エミュレータUIが有効になっている場合、通常はhttp://localhost:4000(または設定によって異なるポート番号)でアクセスできます。
補足)空きポート確認(netstat):
> netstat -ano | findstr :4000

④Emulator 起動
> firebase emulators:start

⑤動作確認
URL(上記結果に表示(http:127.0.0.1:5000)

以上で、Firebase Emulator による Flutterアプリの動作確認は完了です。
今回はHosting機能のみの動作確認でしたが、以降で機能追加等設定を追加します。
3.Firebaseの設定
上記で初期化したFirebaseについて必要な設定を追加します。
(1)Firebase 依存関係の追加
pubspec.yaml ファイルに Firebase 関連のパッケージ(例:firebase_core, cloud_firestore など)を追加します。
(2)Firebase 構成ファイルの追加
Firebase コンソールからプロジェクトの設定ページにアクセスし、Flutter アプリ用の Firebase 構成ファイル(google-services.json または GoogleService-Info.plist)をダウンロードし、プロジェクトに追加します。
(3)Firebase インスタンスの初期化
アプリ内で Firebase.initializeApp() を呼び出して Firebase を初期化します。
4.Firebase Emulator との接続
(1)エミュレーターへの接続設定
- Firebase の各サービス(Firestore, Authentication など)を使用する前に、エミュレーターのアドレス(通常は localhost)とポートを指定する必要があります。
- 例:Firestore の場合、
Firestore.instance.settings = Settings(host: 'localhost:8080', sslEnabled: false);
(2)デバッグとテス
- Flutter アプリを実行し、Firebase の各機能がエミュレーターを介して正しく動作するかをテストします。
- ログや Firebase Emulator Suite の UI を確認して、データの流れやエラーをトラブルシューティングします。
5.注意点
- ローカルでの開発中は、実際の Firebase プロジェクトとは異なる環境に接続されていることを意識してください。
- エミュレーターではリアルタイムのパフォーマンスやセキュリティ ルールの挙動が実際の環境と異なる場合がありますので、本番環境にデプロイする前に、実際の Firebase 環境でのテストも行ってください。
Firebase Emulator Suite と Flutter を組み合わせることで、ローカル環境でのアプリ開発とテストが容易
になり、より効率的で安全な開発プロセスを実現できます。特に、リアルタイムのデータベースや認証機能を使用する場合に、この手順は非常に有用です。開発の際には、Firebase のドキュメントや Flutter のリソースを活用することも忘れずに行ってください。
Happy
0 %
Sad
0 %
Excited
0 %
Sleepy
0 %
Angry
0 %
Surprise
0 %