Read Time:20 Second
Docker(Docker Desktop/Windows10)上にAnacondaコンテナを作成した際の作業記録です。
目次 index【閲覧時間3分】 click !!>>
Toggle1.Dockerfile作成
![](https://i0.wp.com/zakku-spot.com/wp-content/uploads/2023/08/image-46.png?resize=600%2C318&ssl=1)
# 基本となるイメージの指定 FROM continuumio/anaconda3 # 任意のメタデータやラベルを設定 (例として) LABEL maintainer="your_email@example.com" \ version="1.0" # 必要に応じて追加のコマンドを実行 # 例: RUN pip install some-package # コンテナの起動時に実行するコマンドを指定 CMD [ "/bin/bash" ]
2.Dockerイメージのビルド
docker build -t anaconda-image:latest .
![](https://i0.wp.com/zakku-spot.com/wp-content/uploads/2023/08/image-50.png?resize=615%2C40&ssl=1)
※以下はDocker Desktop上のイメージ画面
![](https://i0.wp.com/zakku-spot.com/wp-content/uploads/2023/08/image-53.png?resize=523%2C217&ssl=1)
3.Anacondaコンテナの実行
docker run -it –name anaconda-container anaconda-image:latest
![](https://i0.wp.com/zakku-spot.com/wp-content/uploads/2023/08/image-54.png?resize=640%2C37&ssl=1)
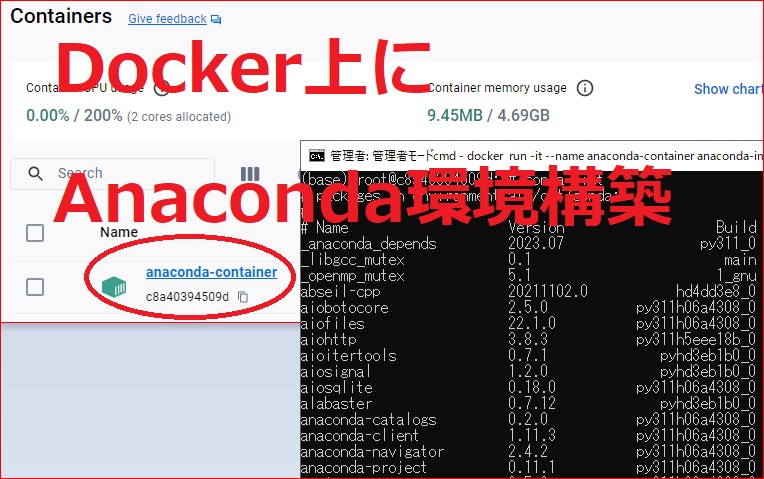
※以下はDocker Desktop上のコンテナ画面
![](https://i0.wp.com/zakku-spot.com/wp-content/uploads/2023/08/image-58.png?resize=640%2C244&ssl=1)
4.Anaconda動作確認
condaコマンドを使用して動作確認する。
※以下では、conda list でAnacondaの現内容を確認
![](https://i0.wp.com/zakku-spot.com/wp-content/uploads/2023/08/image-59.png?resize=616%2C413&ssl=1)
以上で、Docker上にAnacondaコンテナ作成・実行・動作確認できました。
![](https://i0.wp.com/zakku-spot.com/wp-content/uploads/2023/08/image-60.png?resize=640%2C401&ssl=1)